Intro to Pixlr
- eenchanted16
- Jun 30, 2016
- 5 min read
Introduction
Welcome to your beginning introduction for Pixlr. Pixlr is an online/web application program that is used for graphic arts and photo edits. Many of you may know well known programs like Photoshop and GIMP well Pixlar combines a bit of both programs without having to pay or download any software. Due to these factors we have decided at Enchanted Enterprise to make this a universal program to use here for photo edits. This does not mean that you can not use or completely abandon Photoshop or GIMP but as an alternative we are asking everyone (this includes us Staff members) to get familiar with the program and photo editing. Training on using Pixlr will be given with a mix of video,photos and written instructions. If at any time you find it hard to follow please let me (SaiKira) know and I will be helping you along. I think that it is also important to share with you all that I will be learning along with you! So I hope to make this journey fun and exciting and bring everyone into the wonderful world of Photo Editing. Objectives to this Introduction ► Homepage Interface ► Photo Editor vs Photo Express ► Photo Editor Interface & Icons ► Helpful Videos & Resources
Homepage Interface
To access Pixlr you will need to visit there direct website Pixlr.com and you will come up to a page similar to the one shown below

Form here you will have the option to sign up for Pixlr, use the Web Apps, Mobile or Desktop interfaces, and finally the login option. Though we will not explore the Mobile options during the training we will be taking a look into the Web Apps & Desktop option Pixlr has available. So lets get started.
Web Apps
Staying right within the first page listed above click on the Web Apps Option. From there you will be transported to a page that give the different Web Apps that is available through Pixlr. The great thing about these apps is that they are all Free to use and all serve a different function. Starting With the Photo Express Web App this is the app you can use if you just want to add something quick to a photo edit. Mainly you are able to apply a lot of different filters and photo effects. Though on IMVU most editors will tell you to stay away from photo effects and filters they can be used from time to time to add some more dimension to a background or over a photo itself. If you scroll down your next option is Photo Editor. This is the editor that we will mostly be using throughout the Photo Editing Training and Challenges as a part of your cycle. The Photo Edit option allows you to do more in depth photo edits with multiple layers, effects, text and other options that you will be learning. This interface is the one that is most like GIMP and Photoshop. Scrolling down some more we have two other options, one is called Pix O Matic and the other is called Pixlr Touch UP. Pix O Matic is much like Photo Express but it will give you different and more vintage looking photo effects while Pixlr Touch Up will be more used for in enhancing the quality of your photos. Both of these options with the right steps can however also be achieved in Photo Editor and we will be exploring some of those options in challenges to come. For now let's go back to the home back by hitting the BACK arrow on your web browser.
Desktop
Next let us explore what the Desktop option as to offer. For training we will mostly be using the Web Photo Editor but as an option Pixlar offers a desktop version. Some interface may be different from Desktop to web but in short the Desktop Application combines both Pixlr Express and the Photo Editor that we will be using on the web. There is a FREE option to this to download that will give you some basic function or if you opt to you can pay a monthly or early subscription for a few more added features. Honestly, everything you will really need will be a part of the web Photo Editor and there is really no need to pay for a monthly subscription.
Launching Photo Editor
Hitting your BACK button again on your web browser bringing you back to the HOME page I would like from you to scroll down until you see the page below

This is your main area for you to launch either Photo Editor or Photo Express. Once again for much of your training we will be using and exploring the Photo Editor web application. To launch Photo Editor is simple! You don’t even have to sign up or log in for this, all you have to do is click on the Launch Web App button located under Photo Editor and it will launch you right into the web interface as shown below.

From here you have a few options. Creating a New Image and Open Image From Computer is the two options that will mainly be in use and that will depend on the project you are working on. Let's start with Create A New Image. When you click it you will get the following options interface.

Though you do not have to I would recommend naming the document that you are about to start. This will help you later on when you are opening more than one image in knowing which one you are working on now. From there you then Presets. This option gives you a list of already program sizes documents. We will normally not use that option since most IMVU posted photo edits are 700 x 700 we will move down to the 3rd option and enter in 700 with x 700 height like so.

The last option you have is called Transparent. Transparent means setting up a document with NO Background. If you leave it UNCHECKED it will put up a white background for you to start with. If you check it then you will have a Transparent checkered white and grey background. I would recommend always starting with a Transparent background. From there you are all set and just click the OKAY and you will be launched into your new window that is 700 x 700 pixels.

Photo Editor Interface & Icons
Once you have your document started then time to start your image! But before we do that we need to get more familiar with the Tools Menu located on the Photo Editor Interface that looks like this with meanings:

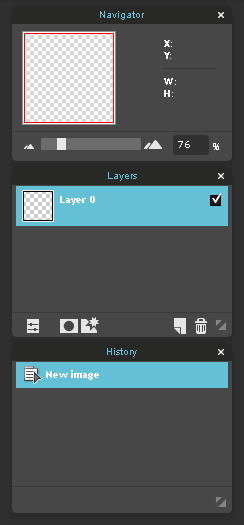
I will provide some Youtube videos that will go more in depth with what each of these icons can do and help you along with your photo edits as well as with some of the assignments we will be using some of these tools as well. Up next on the Pixlr Interface we are going to take a look at the right side of the screen. On the right side you will see the Navigator, Layers and History. They look like this below:

In short, The Navigator allows you to move around the image by simply clicking and dragging. The Layers menu is where the most action in photo editing takes place. This is the home of all your images that you add and in imagine including background is put into its own layer. These layers are editable Lastly we have the History menu at the bottom. This menu basically works as an UNDO. It allows you to click back and forth undoing and redoing anything that you might want to change. Below is another video that goes those some features with the toolbar as well as the Navigation, Layers and History Menus. Just click the image:
Helpful Resources Interface


Comments